Chapter 4 Gitflow and improving your use of Github
4.2 Principles of Gitflow
4.2.1 What is a Github workflow?
So far, everything you’ve learned in our training is about the what of using Git and Github; the practical commands and processes you’ll need to go through in order to get your code onto Github, and that repository linked up to the new code you produce. However, we’ve barely touched upon the how; the approach you take when using those commands.
This is what a Github workflow is; essentially a recipe for how to work on Github. It’s not the physical pushing and pulling of your code, it’s the best practice and principles of how you create and use branches, alongside related concepts such as how you name, document and record the changes you’re making.
Be aware that while you can use Github without understanding good Github workflow and principles, it’ll feel more like a chore than a beneficial tool while you do so. You can only effectively use Github by using it with purpose and a plan!
4.2.2 What is Gitflow?
Gitflow is the name of a common Github workflow. The approach we outline here is simple, logical and consistent, and provides you with some simple principles around how to create branches and what to use them for. It’s not the only approach to using Github, and over time you may find other approaches that you actually prefer; but you should always be making a sensible choice to move towards a new workflow, and not just away from Gitflow!
The idea behind Gitflow is that it provides a standardised way to structure and use your repositories based on a few principles that apply to the vast majority of code:
You need to have live code that you know works, and you always need to know where to find that live code
You need to be able to change and improve code (and importantly this needs to be the case even in combination with point 1 above)
You need to collaborate while coding, so the approach needs to work if multiple people use the same repo
You need to know how to find things easily across your repos; whether this is branches or commits.
You need new starters to quickly understand how your repos are structured
The Gitflow approach enables all of the above to be true, without adding too much of an administrative burden to using Github.
4.2.3 Why do I need Gitflow?
A good Github workflow allows you to get the full benefit from the features that Github offers; issues, pull requests, and everything else we’ve covered in the previous chapters. However, it also gives the following benefits:
- minimises merge conflicts
- standardise your ways of working
- prevent downtime when you break code
- makes it clear what code people should be using
Crucially, if you’ve already read the rest of this book you may notice that everything in this chapter seems very familiar. This is on purpose. Everything we taught you in the first two chapters is designed to facilitate and work flawlessly with Gitflow, so it won’t be much of a step up from the principles you’ve already learned.
4.3 Structure and naming of branches
The most fundamental thing to remember relating to Gitflow is that there are only three types of branches in Gitflow. They’re named and used in specific ways, and you can see them in the diagram below.

In this diagram, you can see the three types of branches; main, dev and feature branches. Each dot on their line represents a change to that branch, moving from left to right.
Main branch
The single main branch contains the final, live version of your code, and is never duplicated or deleted. You can think of the main branch as your “default” branch, if you asked someone to run your code, you’d always expect them to run the main branch.
Because it is the live code, changes are never made directly to the main branch. Instead, they’re only ever merged in from the dev branch after thorough review and end-to-end testing. A consequence of this is that your main branch may not update very frequently; in the diagram above you’ll see it only changes once after a number of changes to both dev and feature branches (and in reality this ratio would be much higher!).
Dev branch
Much like the main branch, the dev (short for development) branch is a single branch which is never duplicated or deleted. The purpose of this branch is to act as a central “hub” of code that’s being developed, allowing testing of multiple features brought in from different branches and making sure they work smoothly as a whole.
Unlike the main branch, the use of the dev branch as a site for identifying and fixing problems means that sometimes small changes and bugfixes are made directly to the dev branch. Major code changes or new features are not made directly to the dev branch though, instead they are merged in from feature branches after code review and unit testing. In the example above you can see that most of the changes are made in this way, with only one of the changes occuring directly on the dev branch.
Feature branch(es)
Every branch that isn’t your main or dev branch is classified as a feature branch. You can have any number of these, from 0 to 1000 (not recommended). Feature branches are created when required to produce a new feature, add documentation or fix a bug, and deleted once they are no longer required; usually after those changes have been merged into the dev branch.
The most import principle of feature branches is that they are for a feature. Each feature branch is created to house one new feature, and can be worked on by one or more people at a time. The majority of changes in code are made directly to feature branches. These single changes are tested to ensure they work as expected, and are merged into dev after testing and code review. Features aren’t merged directly in to main, and they are always deleted after they’re merged into dev.
Now you understand the purpose of each branch, it’s useful to see how they work together as part of a workflow. The diagram below summarises this in a simple flow chart.

As you can see, the gitflow process always starts with branching off dev: creating a new feature branch from the dev branch as it currently stands. You will then make your changes in this branch, limiting those changes to just those which are required for your feature (if you suddenly realise you need a second complimentary feature, you make a second feature branch!).
Throughout the process you (and possibly others) will test the changes you’re making. These are often referred to as “unit” tests; you’re checking that the code you’re writing works to do what you expect. So, for example your function print_table() does actually print a table! This culminates in a code review at the point you’re finished, where someone else checks that your code is good, logical and working. As you can see in the diagram, often you’ll have to make changes based on that review, and this part of the workflow loops around until you and your reviewer are happy with those changes.
Once everyone is happy, you do a pull request to merge your changes back into the dev branch; you bring those changes into dev, and delete the old feature branch. This may seem like a redundant step, but it’s worth remembering that in the days, or weeks, you’ve spent writing that feature, other people may have been working on the code too. Maybe they’ve added a dependency that clashes with the libraries you use, or a feature that requires the data to be in a slightly different format to the one you’re using. For this reason, once your code hits the dev branch, you will want to do some end-to-end testing at some point. Here, you’re not just checking your code works; you’re checking it’s efficient, runs logically, and doesn’t break anything anyone else has done!
Often you’ll find that your code does have a couple of problems at this stage. If these are minor, you’ll probably fix them in dev, making small changes and bugfixes in the dev branch. If these problems are bigger and require substantial changes to the code or documentation, you will probably create a new feature branch off dev and start the whole cycle all over again! Once again, just like in your feature branch, these test and repair processes are cyclical, and you may go back and forth a few times to get things working.
Finally; you will reach a point where you have one or more feature branches merged in to dev, and they will be tested, reviewed and working to your satisfaction. At this point, you will probably want this code to become your live code; the code you would want your G6 to run if everyone else won the lottery and quit next week. To indicate this is the case, you create a pull request to merge your dev into main. This is basically the same as the feature to dev merge, except you’ll want to make sure the accompanying code review is very thorough, and you’re completely happy the code works before merging into main. You also don’t delete the dev branch like you do feature branches!
At that point, congrats, you’re back to the start; notice how the workflow essentially “resets” itself at multiple points so you never need to do a lot of complex busywork before creating a new feature. Features also don’t interact with each other until they’re merged into dev, so you can choose to pick up, pause or abandon features entirely without needing to revert your live code. You can continue the cycle as much as you like, from whatever starting point you like!
4.3.1 Naming your branches
This is the point you need to forget everything you learned in Chapter 1 about branch naming. We named branches after ourselves in that chapter for simplicity, but as you’ll see below you are never going to do that ever again.
Git and Github will let you name a branch just about anything. It will let you call a branch “my_branch_427”, and not care that you shouldn’t really have 426 other branches live. It will let you call branches “my_branch” and “My_branch” and “my-branch” and let you worry about which one is which. It’s impertive that people who use your repo always understand which branch they should be working on at any one time, and therefore you need to use best practice to ensure your branch names are:
In addition to the examples above, don’t make people decide whether they should be using “chart_branch” or “branch_for_charts” when adding a new chart.
Branch names like “things” or “code” don’t help people find the code they’re looking for.
The hardest concept for a lot of people! Much like folders in a shared drive, branches are named after their contents not the people using them. Imagine a shared drive with folders called “Dave”, “Kathy” and “Alex” rather than “Data”, “Charts” and “Reports”…
With that in mind, consider the good and bad branch names below:
4.3.1.1 Good branch names
bugfix/repair_filenamesfeature/add_chart_alt_textfeature/automate_table_write
All of these branches have several features which means they’re named well. They’re all descriptive, if you were looking to work on the branch pertinent to a table automation project or to fix that pesky file name bugfix, you’d know which branch to move to.
They’re also consistent; each branch is named according to the same pattern, and all use snake_case_like_this and all lower case (nb: snake_case and snake-case using underscores and hyphens respectively are equally good, but I slightly prefer underscores. Don’t mix and match!). They’re not too short or too long, you can tell some thought has gone into making the names readable.
And finally, the use of feature/, bugfix/ or documentation/ at the start of a branch name is a nice touch; you can tell at a glance whether the branch is adding new features, fixing a problem, or updating documentation.
4.3.1.2 Bad branch names
“Happy families are all alike; every unhappy family is unhappy in its own way.” - Leo Tolstoy
As you saw above, all good branch names are very similar; clear, unambiguous, descriptive, and stylistically similar. In contrast, bad branch names can be bad for a wide range of reasons. Let’s check out some of the options:
Branches are for features, not people. Your branches should be specific to what you’re doing (e.g. automating a table, producing a chart), not who is doing it. This avoids duplication of code, makes changes easier to find, and prevents merge conflicts.
Names like “code”, “changes” or “stuff” are not helpful. All branches contain code and changes. Take a moment to write a descriptive name — it’ll help you and others quickly locate the branch later.
Branch names like this come from fear of breaking something. But Git is made to handle changes and reversions. Trust your workflow. Use the branch. If something breaks, you can always revert.
Descriptive branch names are good — excessively long ones, not so much. Focus on the key change or goal and keep it concise.
Mixing uppercase/lowercase and underscores/hyphens is messy. Be consistent with your naming style to reduce confusion and increase clarity.
This is a good name if it’s temporary. Don’t keep dead branches. Merge final changes to main, delete the feature branch, and tag the release. Releases capture snapshots cleanly without cluttering your branch list.
4.4 Managing your code
One of the advantages of GitHub is how flexible it is; you can modify aspects like branches, commit messages, and how you store your code to suit the way that you work and the projects you’re working on. A downside of this is that when you’re starting out, this freedom can be a bit too much, and it can be hard to know the best approach to take. This section walks you through best practice in these areas to help you make choices when you first get started!
To note, as you become more of a GitHub expert, you’ll realise that there are some occasions where one or more of these best practice rules don’t apply. However, they’re a good starting point, and you should only deviate from them where you’ve got a clear rationale and you’re confident that there’s no better way of doing it.
4.4.1 What should you store on Github?
While Github is set up to allow you to store pretty much anything on there, that doesn’t mean you should. This section is a quick breakdown of things you definitely shouldn’t and definitely should put in your Github repos.
Please note that setting your repository to private does not exempt you from any of the below rules; a private repo can still be seen by plenty of people (…such as me), and gets you comfortable with bad security practice which is far too easy to transfer to other repositories.
4.4.1.1 Don’t store:
Any secret that grants access to data or systems (like passwords, API keys, or tokens) should never be stored in code. Instead, use environmental variables or prompt the user securely at runtime.
Never include login credentials or IP addresses in your code. These are considered sensitive and should be stored securely outside the codebase.
Don’t store personal details (like private email addresses) in your code. If an email must be included (e.g., in a package), use a non-personal or shared mailbox address that you are comfortable sharing publicly.
Generally, avoid uploading data to GitHub. It increases the risk of accidental disclosure. The only exceptions might be small, public lookup tables (e.g. CSVs).
Although GitHub allows media uploads, it is not optimized for large files. For regular media access or storage, consider alternatives like cloud storage platforms.
Git is best at tracking changes in plain-text files (e.g., .R, .csv, .txt). For binary files like .xlsx or .docx, Git can only see that something changed, not what. If change tracking is needed, store these files on SharePoint or a system with version control for binary files.
4.4.1.2 Do store:
Code is the main thing to store in a GitHub repo! You can mix code from different platforms (e.g. R and Python) and track different file types (e.g. .R and .Rmd). GitHub helps manage and version your code effectively across your whole team.
Word, Excel, CSS, and background images used as templates can be stored in GitHub to ensure a consistent look and feel across outputs. It helps everyone work from the same version and makes updates easier to manage.
Images under 100KB can be stored directly in your repo for reliability and version control. This ensures your code doesn’t break if an external image link fails.
Documentation such as READMEs or inline code comments should live alongside your code to ensure everything stays in sync. This helps others (and future you) understand how to run or contribute to the code.
Use the GitHub Issues section to log bugs, feature requests, or improvements. This keeps track of project history, documents known issues, and supports better collaboration with others working on the repo.
4.4.2 Writing helpful commit messages
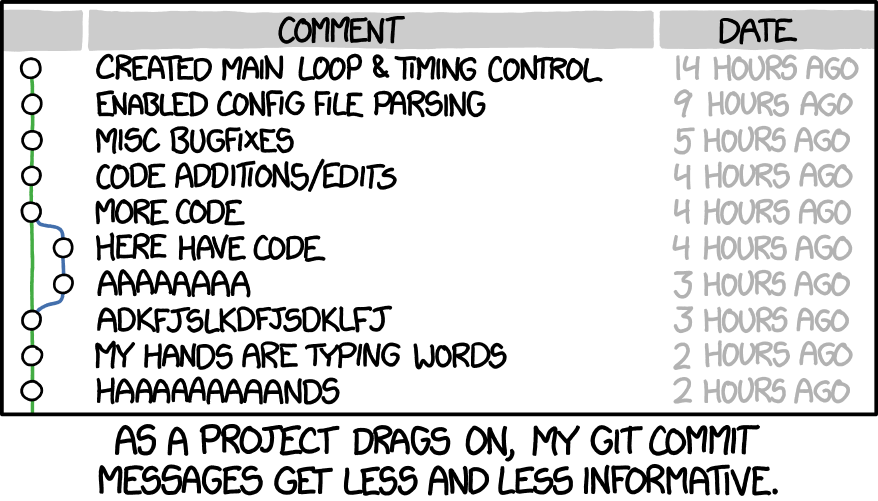
As the above comic illustrates, it’s very easy to slip into a situation where your commit messages are seen as a chore rather than a useful and fundamental part of the coding process. People will often think they’ve found a workaround (committing once a day with the date as a commit message is surprisingly common), and miss the point that you don’t want to work around committing.
Like quality assurance, good commit messages give you and your team the confidence that your analysis has been performed appropriately, and are a fundamental tool in helping you to find the source of problems when they occur. With that in mind, with commit messages you should aim to:
A commit message has one purpose: to answer the question “why on earth did you make this change?” in six months’ time. One or two sentences is plenty, and there’s no need to paraphrase your code. Focus on the why, not the how.
If you find yourself writing “and” in a commit message — congratulations, you’ve got two commits! Split them up. Git interfaces (like in RStudio) let you commit one file, or even specific lines, at a time so you can stay focused.
It can be tricky to judge what counts as “one commit” when you’re new to git. When unsure, commit more frequently. You can always squash them later — but frequent commits help others (and you) follow the coding logic as it develops.
Commit messages should explain what changed and why — not how you did it. Assume your reader can understand the code, but wants to know the reasoning behind your change. e.g. “Updated labels to match stakeholder feedback.”
It’s optional, but starting commit messages with labels like bugfix, chore, or improvement helps people scan histories more efficiently. Pick one format and stick with it for consistency.
4.4.3 Pushing and pulling your code
Like committing, when you first get started with Git it can be hard to know when to push and pull. Getting into the habit of doing this regularly is important for a couple of reasons:
- Your code isn’t actually backed up until it’s pushed up to that remote repository
- Other people can’t see your changes until you push and they pull, so work can be duplicated
- Infrequent pushing and pulling increases the risk of merge conflicts (very bad)
When working at the same time on the same branch as someone else, proceed with caution! The best way to do it is to make small changes, push and pull frequently to ensure your versions are as similar as possible, and communicate every time you’re doing either of these processes. This “to me, to you” methodology is extremely effective when working at pace, and is the best way to avoid merge conflicts when working at speed.

It’s also worth noting that if you find yourself getting a lot of merge conflicts even following these suggestions, you might want to alter the way you are collaborating on this issue; split it into two smaller problems and have separate branches, or consider an hour of paired coding to get through the common changes you both need.
Pushing and pulling can also be a big chore if you are using PAT token authentication, which requires you to log in every time you do so. I’d strongly recommend swapping to SSH authentication to simplify this before you start regularly using Github!
4.4.3.1 Pulling
Pulling code updates your local version of the project to match the remote Github repository, and incorporate other people’s changes.
At a minimum, you should pull down changes at the start of every day (or every day you’re coding at least!), so you have changes made by other people the day before. Preferably, you should also pull down every time you know someone else has pushed up a change, and every hour or so while you’re actively coding. This is because small, frequent merges are much easier to incorporate than large, infrequent ones.
4.4.3.2 Pushing
Pushing code updates the relevant branch on Github to include your local changes, and allows other people to see your changes.
At a minimum, you should push changes at the end of every day. But also preferably after every 2-3 commits, or once an hour while working, especially if you know someone else is working on the same branch.
4.4.4 Writing your README
As default, any new repository will either come with:
- an entirely blank README (if you’re starting from scratch)
- a default README (if you’re starting from a template)
Whatever you do please customise your README. README files are an essential part of your repository, and they show up on your front page for good reason. It’s the first place people will go to check they’re on the right repo and understand how to use the code.
Writing a good README will be covered in a later chapter, but broadly:
- your README does not replace code comments, it compliments them
- make sure it is kept up to date and allows for a beginner-intermediate level coder to use the code in your project
- make sure it links to any more detailed or in-depth desk instructions or developer notes stored elsewhere.