Chapter 2 Introduction to Git
2.1 Session aims
- how Git works
- the main Git commands
- cloning a repository
- creating and checking out branches
- adding and committing files
- pushing and pulling to the remote repository
Definitions you’ll need in this chapter
Git: Git is a version control system that helps you manage changes to your code or files. It tracks modifications, keeps a history of changes, and allows collaboration among multiple people working on the same project.
GitHub: GitHub is a platform that hosts Git repositories in a remote location on the internet.
Repository: A repository (or “repo”) is a place where you can store and manage your code or any other files. It is a folder that holds all the files relevant to your project, but also contains the version history and information related to a project. There are two different types of repositories: local repositories which are personal to you and on your local computer, and remote repositories which are on Github and shared with others.
2.2 How git works
Fundamentally, git works by storing your files inside an individual repository. While a repository looks like just a folder that contains your code files, it actually performs a number of functions all at once:
A repository contains all the files and folders that make up your project, from source code, to text documents, images, and more.
Git continuously tracks changes made to the files within the repository. Every time you make a modification, git creates a snapshot of the entire project at that moment. Known as “commits”, these store the state of your project at different points in time, allowing you to revisit or revert to earlier versions as required.
On top of this, git stores metadata, such as who made specific changes, when they were made, and why. This helps you understand the progress made throughout the project and facilitates collaboration among team members.
All of this is done through a set of simple git commands, and the version history is stored alongside the files. In this way, git tracks the changes you make locally; to share the changes with others you would make use of Github as well.
2.2.1 Branches
Git also allows you to make use of branches to swap between different versions of code. Git branches are effectively a separate line of development within your code. When you want to add a new feature or fix a bug—no matter how big or how small, you create a new branch to your changes. This makes it harder for unstable code to get merged into the main code base, and it gives you the chance to clean up your content before merging it into the main branch. The point at which you create a new branch, it becomes a duplicate of the branch you started from; it will then diverge from that old branch as you make new changes, and eventually further down the process you will merge it back in to the branch it originally came from.
Importantly, branches are for new features and content, not individual people! Think about them like individual folders inside a shared drive; when producing a new chart you’d work inside a folder (or branch) called “charts” and not one called “Dave’s code”.
(And don’t worry if branches seem a bit abstract right now; they’ll make a lot more sense in the next chapter!)
If you would like to make use of a command line tool (git bash or the R terminal), try out the basics in this mini-exercise:
Open Git Bash, type “ls” and press enter: What do you think this command does?
Now type “pwd”
Now type “cd ” followed by the name of a folder (e.g. g), what has changed in the git terminal and what do you think the command has done?
Try typing “ls” again and see what is being displayed now
Try using the up and down arrows – what do you think this is doing?
And the answers to this exercise:
The command ‘ls’ is used to “list” contents of the current working directory.
The command ‘pwd’ is used to print the present working directory.
cd is an acronym for ‘Change Directory’. cd is invoked with an appended directory name. Executing cd will change the terminal sessions current working directory to the directory specified. The text at the start of your command line will indicate the fact that the working directory has changed. You can use “cd ..” to go up a level in your directory
As your working directory has changed, ls will now show a list of files in the new working directory.
Up and down arrows can be used to navigate through the last commands you provided, press enter to run any of these again.
2.2.2 The git workflow
Actually using git follows a few basic steps. This section aims to talk you through the purpose of each of these steps, as well as the RStudio point and click interface process required to carry them out. There are also drop down git command line boxes associated with each section; click these if you’d like to see the git commands happening behind the scenes (or use them for yourself!)
2.3 Cloning
The first time you work with a git repository which has already been set up, you need to clone the repository from Github into your local Git workspace. This makes a copy of the remote repository locally, copying down all of the files and the version control history.
There are two important things to note about cloning:
You only do it once! Cloning a repository only happens the first time you use it. After that, you make use of the pull command to bring new changes down from the remote repository to your local one.
You always do it to a personal file location! Never clone a repository to a shared drive; many of the features will not work properly, and you’ll also re-introduce the risk of overwriting other people’s changes when you collaborate. With Github, your remote Github version is the shared version, and your git repository goes in a home/C drive directory.
Depending on whether you have set up an SSH key or a Personal Access Token (PAT), the method for cloning a repository will differ. SSH keys provide a secure, key-based authentication method, while PATs act as passwords for HTTPS connections. If you’ve configured an SSH key, you can clone using the repository’s SSH URL. If you’re using a PAT, you’ll need to clone via the HTTPS URL and provide your token during authentication.
How to clone a repository using an SSH key in Cloud R:
2.3.1 How to clone
Using an SSH Key
- Go to the GitHub link for the repository you want to clone; you can find this on the repository’s main page, typically under the green “Code”
- Choose the SSH tab
- Copy the SSH URL, e.g.:
git@github.com:your-username/your-repo.git
- Go to R Studio
- Go to the menu: File > New Project > Version Control > Git
You will see a pop-up window which looks like this:
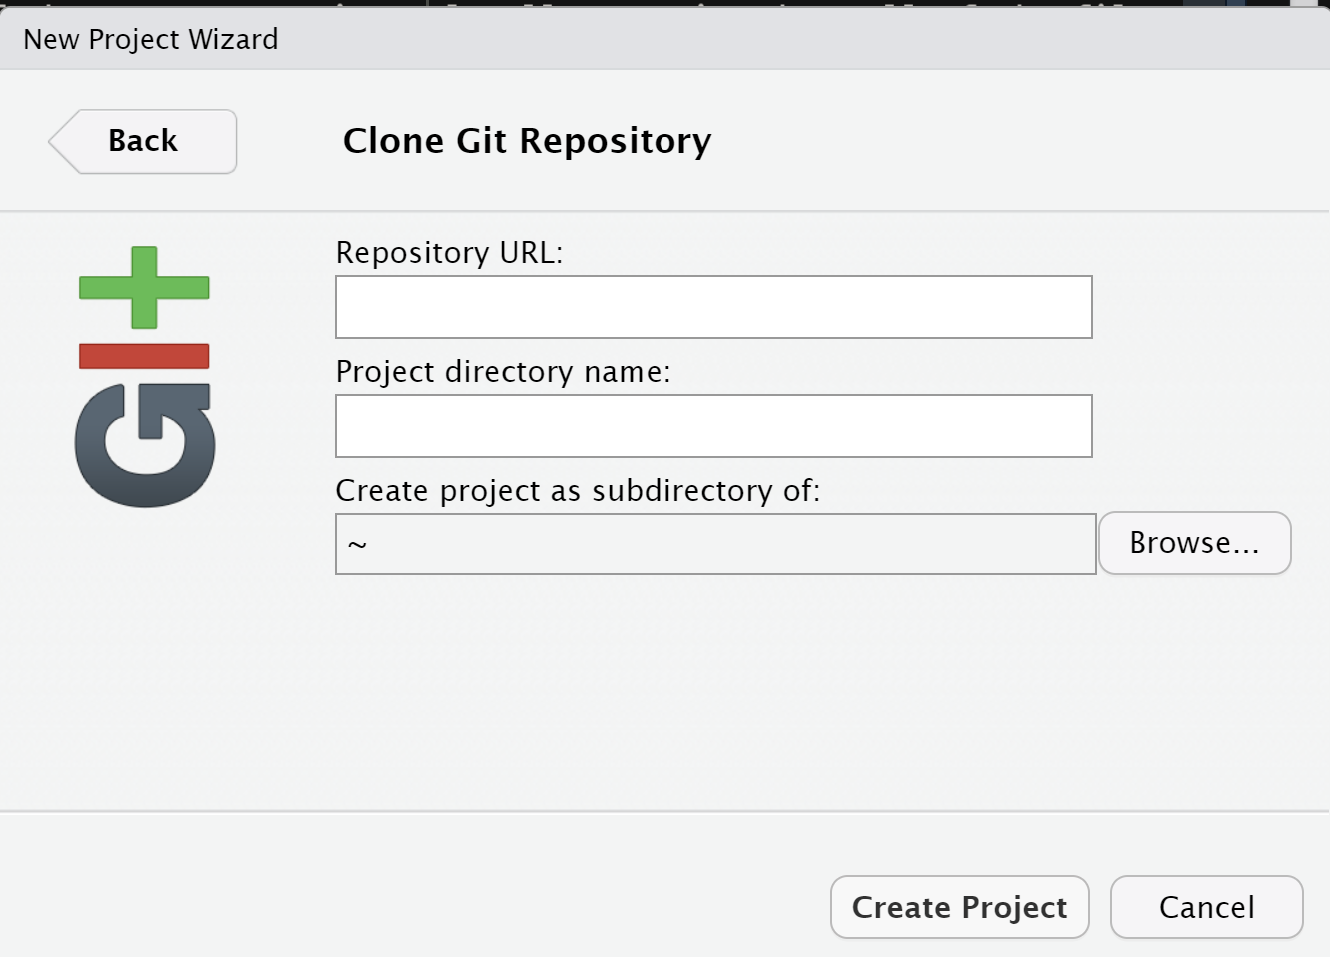
In each field:
- Repository URL: Paste the SSH URL
- Project directory name: Will be auto-filled so you can leave it blank
- Create project as subdirectory of: Browse to select a location where the repository will be cloned. In Cloud R, your home directory (~) is a suitable choice
Click Create project! Git will clone the repository from GitHub and open the project, so you’re ready to begin working
After this step, all the remaining stages take place in the Git window panel in the top right of your screen.
What’s happening in the command line when you do this
Navigate to the correct working directory using the “cd” command followed by the location
Use the command “git clone” followed by the repository URL to clone the repository. Again, you may need to enter your authentication details at this point.
Navigate into the new git repository that’s been set up using the cd command followed by the name of the repository
2.4 Branching
As mentioned earlier, when making changes to code you will likely want to create a new branch to make those changes in. You can then make those changes safely when collaborating with other people, and reduce the risk of making changes which conflict with someone else’s, or overwrite important code.
Creating a branch makes a new, clean duplicate of the code in the default branch, and allows you to make new edits to that code in a separate working environment.
2.4.1 How to branch
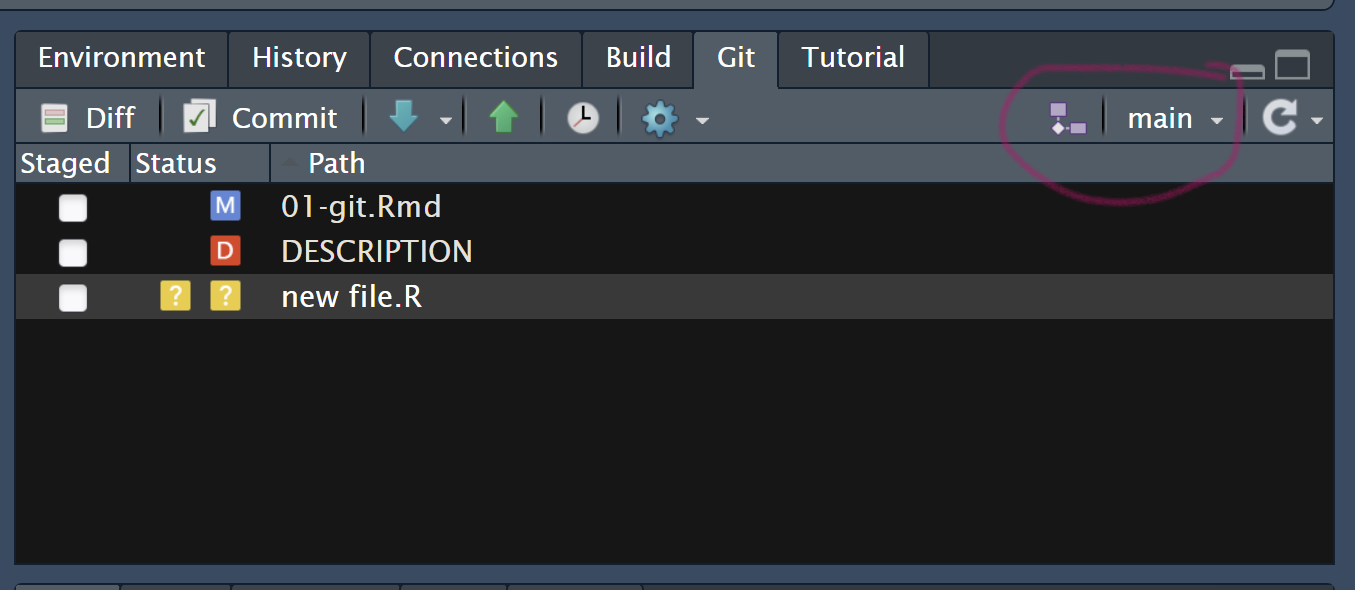
- For branching, you’ll need to use the two branching buttons circled in red below.
Select the branch you want to branch from first; this will usually be “dev”. You can do this by clicking the arrow next to the word “main” and selecting the name of the branch there. If the name showing here is already the one you want to branch from, you don’t need to do anything at this step.
Now click the purple boxes next to this. A pop-up will appear, and you can type the name of your branch into here.
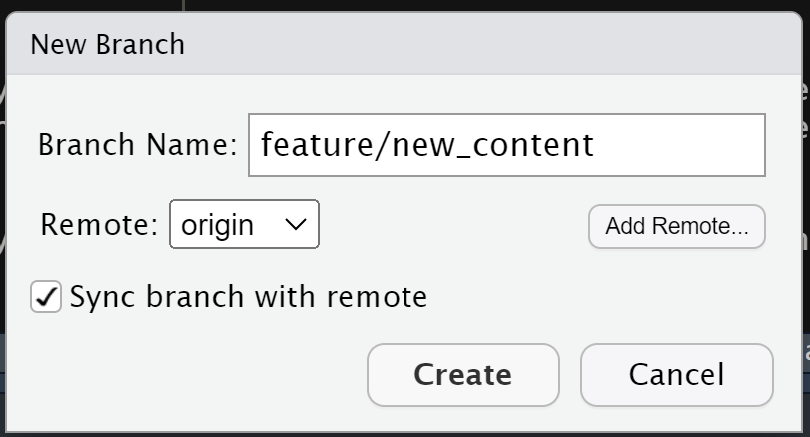
Good practice for naming branches:
- use descriptive and concise names that reflect the purpose of the branch (e.g. feature-new-dashboard or bugfix-login-error)
- avoid using spaces or special characters; use hyphens or underscores instead
- follow a consistent naming convention agreed upon by your team (e.g. feature/ or bugfix/ prefixes)
- keep branch names lowercase for simplicity and compatibility
- Click “Create” to produce the branch. A pop-up will appear at this point, letting you know that the branch has been set up, linked to the remote repository, and you have automatically been moved over to that branch.
You are all set to start making changes!
What’s happening in the command line when you do this
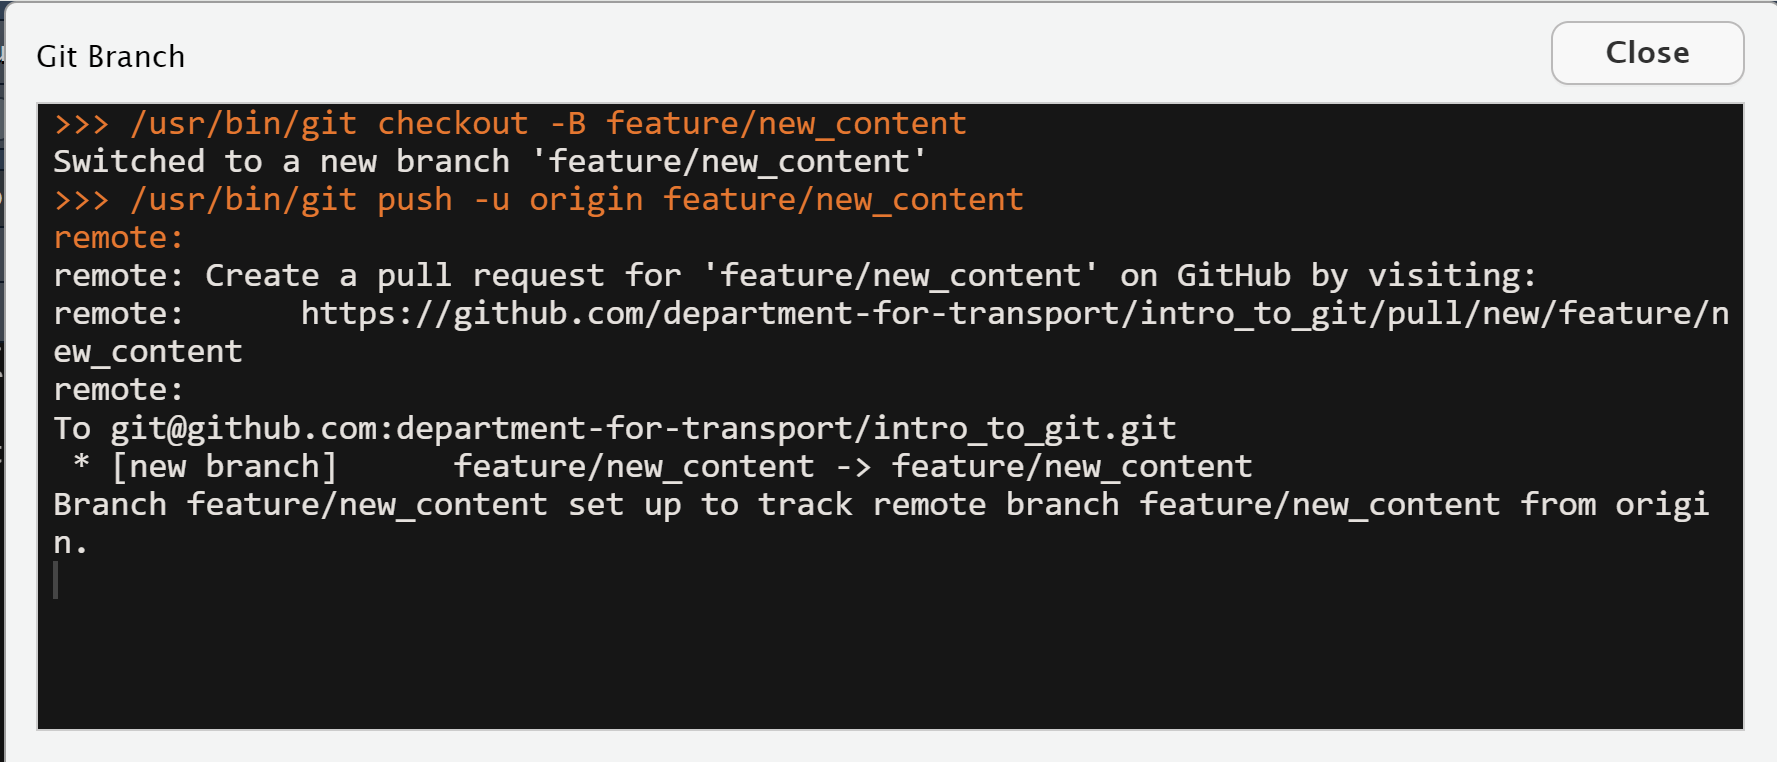
When inside the git repository, type “git branch” to see what branches are available in your repository. There will be a star (*) at the start of the name of the one that is currently active.
If you need to change which branch you’re currently on, use “git checkout” followed by the name of the branch you want to move to.
Run “git branch” again to check you’ve swapped to the correct branch.
Now, to create a new branch do “git branch” followed by the name of the new branch you want to create e.g. “git branch feature/new_content”. You should get a message saying this has been done.
To move to the new branch, use the “git checkout” command again.
2.5 Making a change
This bit happens as normal! You can now open and edit code files, text files, etc. as normal. The important thing to remember is that using git doesn’t replace any of the normal coding process, you still open and edit files in the same way, and save them once you’ve finished editing.
2.6 Staging
Staging is the most complicated step for most people to wrap their heads around!
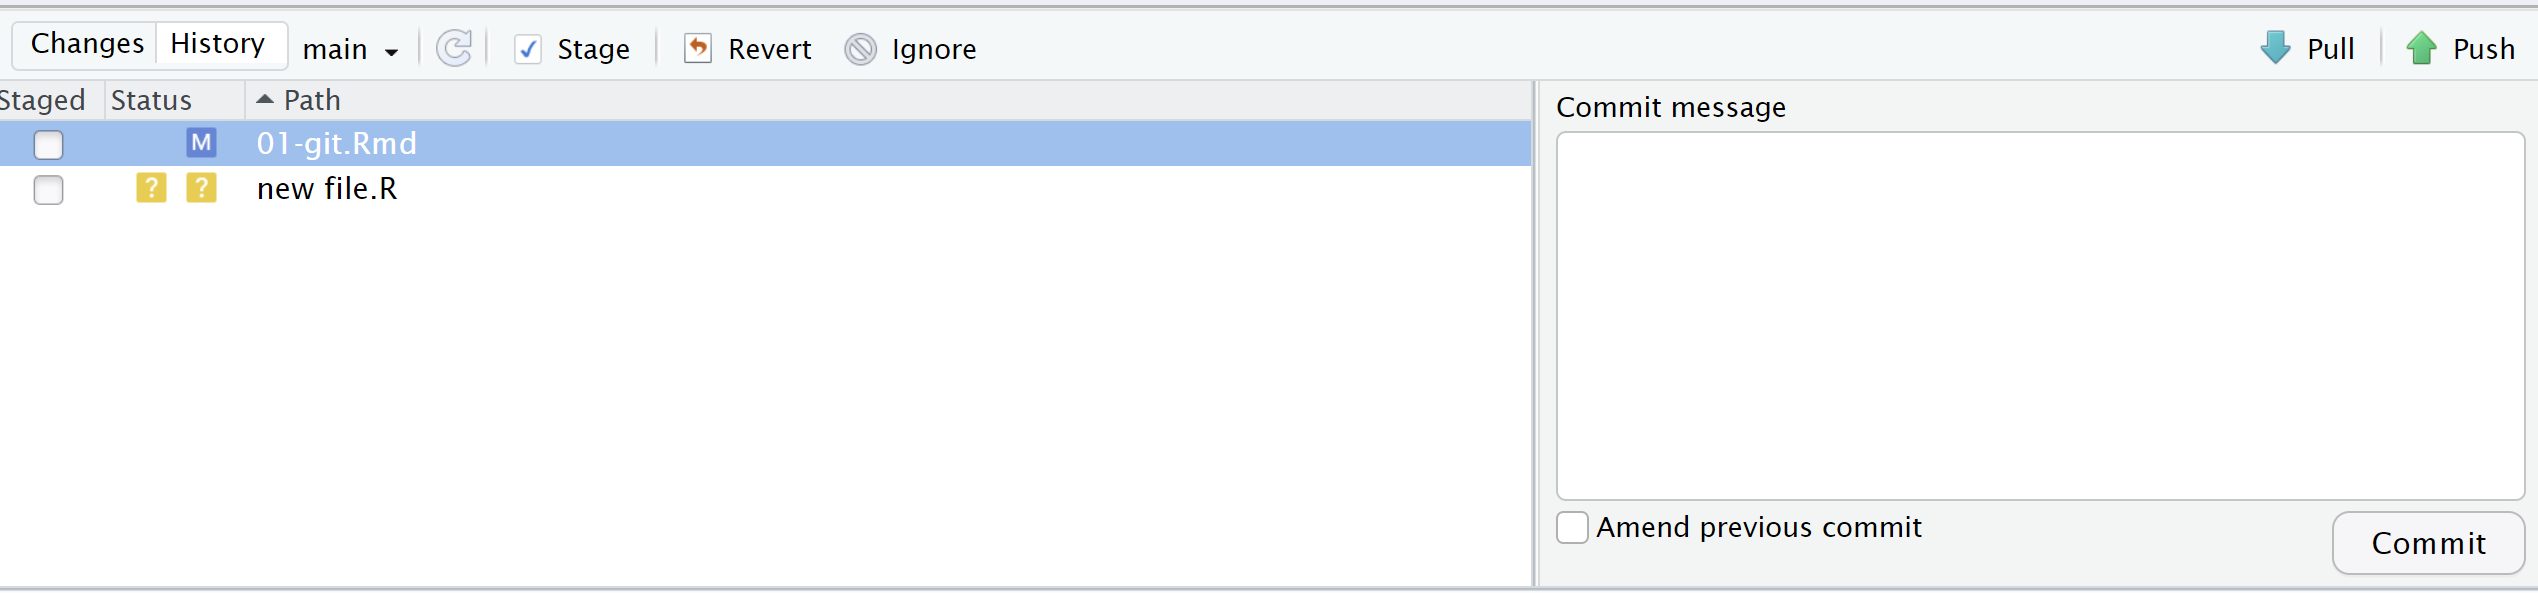
Essentially at this point, you have files which contain a variety of changes. These will show up in the git window in the right hand side of your screen looking like this:

Each line in this window represents a file with changes that have been made but are not yet tracked by Git. To start tracking these changes, you need to add them to the staging area. The staging area works like an online shopping cart: the changes are like items you have viewed online, but they will not move to the next step until you add them to the cart by staging them. You can choose to stage all files at once or only a specific subset.
2.6.1 How to stage
On the left-hand side of each file is a column titled Staged. By default, all checkboxes in this column are unchecked.
To stage a file, click the checkbox next to it. When you do this, the Status boxes will move horizontally and may change their color or symbol. These symbols indicate the file’s current state:
| Symbol | Colour | Meaning | Description |
|---|---|---|---|
| M | Blue | Modified | A file that contains changes. |
| ? | Yellow | Untracked | A new, moved or renamed file not yet tracked by Git. |
| A | Green | Added | A brand new file. |
| R | Purple | Renamed or moved | A file that has been renamed or moved. |
| D | Red | Deleted | A file that has been deleted. |
- If you are not sure if you’d like to stage a file or not, click the “Diff” button. This will show you a line-by-line breakdown of the changes in each file, so you can understand more about what has changed.
That’s it! You’re now ready to move on to the most important stage; committing.
What’s happening in the command line when you do this
When inside the git repository, use the “git status” command to see what files are currently staged or unstaged.
Use the “git add” command to stage files. Use git add followed by the name of the file (e.g. “git add new_file.R”) to stage a single file, or “git add .” to stage all files at once.
Use “git status” again to see which files are now staged or unstaged.
To check the line-by-line changes, use the “git diff” command. This can print out a lot of content, so use the ENTER key to tab through it all. To escape from this mode, type “q” then ENTER.
2.7 Committing
Committing is probably the most important step of the git process. This step saves a snapshot of your staged files to your repository version history as a commit. This saves the changes that were made, alongside the time they were made, who made the change, and gives you the opportunity to add a commit message. This is a free text box that allows you to explain the purpose of the commit, so when you look back at the history of the repo you can see why you made this change.
2.7.1 How to commit
Above your staged files in the Git window, click the “Commit” button.
This opens the commit window. In here, you can see the files that have been staged and the individual changes in each of them.
- Add a commit message in the box in the top right of the commit window. This should be a short but sufficiently detailed message which explains in a few words the purpose of the changes you’re committing.
Example: “Fix typo if course introduction section.” This message is concise but descriptive, highlighting the purpose of the change (fixing a typo) and specifying the context (course introduction section).
Click Commit! A window will pop up to let you know it’s happened successfully, you can close both this and the commit window.
When you close the commit window, you’ll notice that above the staging window, there’s an information message which now says “your branch is ahead of
branch_nameby 1 commit”. This message tells you that there are committed changes in your local repository which you have not shared with your remote repository.
You are now ready to share your changes with others!
What’s happening in the command line when you do this
Use “git status” to see which files are staged ready for commit.
The base command to commit your staged changes is “git commit”. However… Warning! Using git commit without any further modifications opens the VIM editor to allow you to create your commit message. This is notoriously difficult to use, so I recommend you avoid it!
Instead, use “git commit -m ‘your message here’” to provide your commit and your message at the same time. Your commit message will need to be less than 140 characters inside the command line.
Use “git status” again to check your changes have been committed.
2.8 Pushing
At this point, your changes are committed locally. But if you’re using GitHub to collaborate and share code, or as a backup to your local code, there’s one final step.
Pushing code describes sharing the files and version history stored in your local repository up to your remote repository. As well as allowing for collaboration and backups, GitHub also provides a much easier way to view the history of commits (which we’ll cover more in the next chapter!).
2.8.1 How to push
Once you have one or more committed changes, hit the green “push” arrow. Depending on how you’ve authenticated, you may need to provide your username (email address) and password (PAT token) at this point.
A pop-up window will appear confirming that your push has been successful.
That’s it! Your changes will now appear on the remote repository.
What’s happening in the command line when you do this
Once you have your changes committed, use the “git push” command to push those changes up. As above, you may need to authenticate at this stage.
If this is the first time you are pushing on this branch, you may instead need to run “git push –set-upstream origin YOUR BRANCH NAME” which both creates a remote branch equivalent to your local branch, and pushes the content up. This is done for you automatically if you are using the RStudio point and click interface.
CRAN Shorts - How to commit and push changes with the terminal
2.9 Pulling
Pulling represents both the end of one git cycle and the start of the next one. As the name suggests, it’s the opposite of pushing, and it allows you to take changes other people have made in the remote repository, and bring them into your local repository.
As mentioned above, when you’re using a repository after the first time, you will pull the changes down rather than cloning the repository in the steps above.
2.9.1 How to pull
Press the blue arrow to pull down changes from the remote repository.
A pop-up window will appear confirming that your pull has been successful, and you will also see that the content of your local files changes directly.
You can pull down at any time, but you should do so at least once a day when you’re coding, or when you know someone else has made a change.
What’s happening in the command line when you do this
- You can replicate the process above using the “git pull” command.
2.9.2 Exercise
You’re now going to practice collaborating with someone else on GitHub! This will include pulling down someone else’s changes, making a change to their work, and sharing it with them:
If you’re working through this book on your own, please only complete Question 1 of this exercise:
Pull down to get the latest changes made to the remote repository.
Use the dropdown branch list to identify the branch of the person you have been paired with. Click on it to move to their branch.
Note how your files have now changed to their files, you should only have their changes in your files now.
Add a change to one of their files.
Stage the change you have made.
Commit the changes to the git repo.
Push it back up to GitHub.
You have successfully collaborated on a branch created by somebody else!
2.10 Best practices
Git is a powerful tool for version control, but adopting the right workflow can help you manage your code efficiently, especially when working in teams or on larger projects. Below are some best practices to follow when using Git, whether through point-and-click interfaces, or by using Git commands in the terminal.
- make small, frequent commits that represent logical chunks of work. This makes it easier to track changes and roll back to earlier states if needed
- avoid making huge commits that include multiple unrelated changes. Instead focus each commit on a specific task or bug fix
- a good commit message is clear and descriptive. It should by the “why” behind changes, not just the “what”
- Examples:
- “Fix bug in user authentication logic”
- “Add unit tests for data processing functions”
- “Refactor code for better readability”
- always create a new branch when working on a feature or bug fix. This keeps your
mainbranch clean and free of unfinished work - name branches descriptively to indicate their purpose (e.g.,
feature/user-authenticationorbugfix/login)
- before starting your work, always pull the latest changes from the remote repository to ensure you’re working with the most recent code
- pull regularly while working to avoid conflicts later. It’s easier to resolve smaller conflicts incrementally than all at once at the end
- avoid working on the same files as others. Ensure you are regularly pulling changes to stay up to date with the latest updates in the remote repository
- use feature branches, and push small frequent commits to isolate your work and reduce the chances of pushing conflicting changes
- push your changes to the remote repository frequently to back up your work and share your progress with collaborators
- avoid pushing incomplete work, but don’t wait too long between pushes, especially when working in a team